Wednesday 12 December 2012

My Other Coursework

Other than the bulding extension, I also had to do a 10 second advert.  Since my film trailer was a bit dark and eery, I decided to do something a bit light hearted and cheesy - what I ended up wiht was an advert for a ficitional toilet plunger brand called Plunger Perfect and a brand mascot called Peter Plunger.

You can see the final advert (and my brilliant double-take) here:
https://vimeo.com/55182943
Here are some rendered stills from my video

and the character

and a screenshot of my character
 

Just as with the st extension, everything was rendered out originally as 32-bit floating point OpenEXR's.  This meant that I had to turn of mr Photographic Exposure Control, set the frame buffer to 32-bit and turn the input and output bitmap gamma settings to 1.0...  Unfortunately I forgot to set the input gamma to 1.0 from its default of 2.2, but I noticed that the bitmaps weren't the colour that they should be in my material editor, so I add a Color Correction texutre node and adjusted the gamma that way - so it was a bit of extra work, but I'll now remember to set the bitmap input gamma to 1.0.
 
 
The character's rig is my first attempt at creating a custom rig from Max's Bones, other rigs I've done before have been with CAT.  Cat has some fairly well documented bugs and they always seem to appear when you least want them to, by creating my own custom rig I knew that it was going to be stable and give me all the control that I wanted.
 
I textured my character in a combination of Mudbox and Photoshop; first off I'd lay down some base colours in Mudbox and then use Photoshop Mixer Brush Tool to give it that hand smudge look which I like.
 
As for the bathroom itself, I experimented with a cloth simulation for the towels and I had hoped to add Hair & Fur to them but it took a very long time to render and it also gave me some strang shadows which I really didn't like the look of.  But, that's something for me to work on over Christmas.

Film Trailer (Which Includes Building Extension)

If you've read the posts about my building extensions then you might like to see the finished video - actually there's two videos which are just variations of each other.

Here they are:
https://vimeo.com/54772526
and
https://vimeo.com/55178434

The sounds were all sourced from http://www.freesound.org.

Sunday 2 December 2012

Building Extension Composition

To follow on from the previous post, I applied all my textures in my 3ds max scene and rendered out a 32-bit OpenEXR image with an output gamma of 1.0.

OpenEXR's are really good if you want to do any further compositing because all of your render elements are stored in just one files, so it makes file management a lot easier and because they're 32-bit floating point images it means that you can accurately adjust your exposure, gamma and offset in an application like Photoshop of After Effects without getting areas which are completely blown out or getting image stepping - this is in part due to the fact that float point images by their nature have far more values than the standard 8-bit JPEG or PNG so you can be more aggressive with your filters or image adjustments and still get good results.  Finally, if OpenEXR's are good enough for ILM to use, I'm sure they're good enough for me to use.

I set the output gamma to 1.0 so that any compositing I'd do would be more accurate, this is because my images are coming out of 3ds max with linear gamma (1.0) meaning that they haven't had any gamma correction already applied to them (say, 2.2 which is the default in 3ds max) so using layer blend modes like Multiply and Add will give better results.

Although I really liked the results I was getting with QuickSilver, I needed fine control over such elements as ambient occlusion and reflections in post-production so I opted to go with mental ray and render out these elements along with a series of Mattes so I could reduce their opactiy and hue and sturation and add colour filters and gamma adjustments.  Rendering out Matte passes is much more useful than rendering out and Object ID pass - although it can take longer to setup the Matte passes have the same anti-aliasing as the actual images, so when you apply them as mask they work perfectly without giving any unsightly jagged edges which is typically what you get when using an Object ID or Material ID pass.

I lit my scene with a single Skylight; I was fortunate that when I recorded the video that the CG elements will be placed in, it was a very overcast day with direct light - perfect conditions for applying the Skylight.  In my Skylight I applied an HDR image into the environment slot to give me image-based lighting, I also placed this image into the environment map slot of the Environment and Effects window to take care of the reflections.

Here are a few combined images of my colour and matte passes.


I combined these images firstly in Photoshop but then realised that I wanted to make further changes to them in my After Effects composition I'd have to rework and resave the Photoshop image which could be time consuming if I had to do it multiple time.  So I redid the image composition in After Effects so that it was quicker to adjust.

Here are two final images, the first one has been colour corrected, blur and grain-matched to blend it with the live footage, the second image has additional filter which were applied to my entire composition including the live action footage.


I'll post a link to the final animation and make another post about the other course work I've done.

Friday 30 November 2012

A New Update - Finally

So, as one part of my masters course work I've got to composite CG images into live-action and another part of work I've got to do is to composite (via chroma-keying) live-action into CG image (I'll do a seperate post on the latter of the two course works).  For my live-action footage I filmed outside and inside Glasgow's Kelvingrove Art Gallery which is provided a nice backdrop.

I just started placing my building into my live-action scene, here's the original image I was working from


Here's the mask I created for it in Photoshop using the Pen Tool


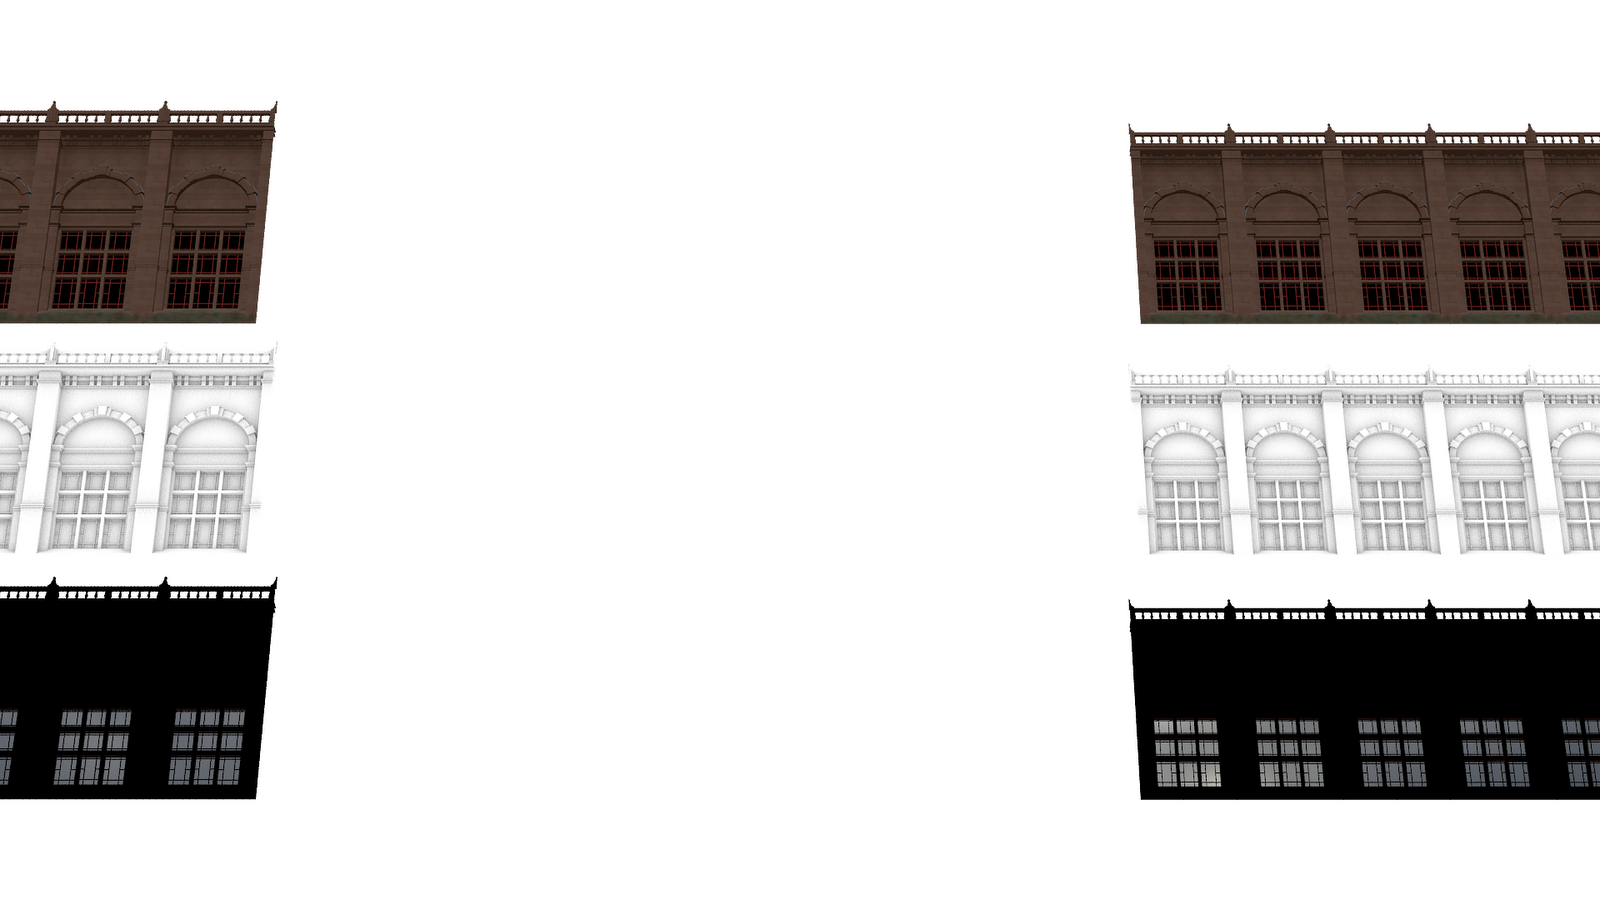
And here's my first render of my building objects placed in the scene


There's a few interesting things I've done:

I cheated quite a lot with the actual placment of m building objects in 3D space,they're in completely arbitrary locations, but if it looks good from the camera's perspective then it will work.

I used LookAt constraints to make my image plane always look at my camera wherever I moved it and I place my cameras target to the centre of the plane so it always looked at the plane - this allowed me to easily get the correct perspective.  If you need help working with the LookAt constraint just ask me.

I tried to model everything to what I thought was an accurate scale (my buildings are just over 5 metres high), this gives me nice, realistic soft shadows.

I took a concept from games design which to create your buildings in a modular way so that you can create one object and one texture map and duplicate it across a large area giving you a lot of detail in a very small space of time.

I'm using the QuickSilver renderer - this is a really nice hardware accelerated renderer which is halfway between Scanline and mental ray (both of which run off of your CPU); you can use the Arch & Design material along with many other mental ray materials and textures and even mental ray photometric lights.  The render parametres are very simple, you don't have to worry about final gather point density, rays per final gather point or anything like that - it's a simple check box for indirect illumination, shadows and ambient occlusion.  The first render you'll do will take a few seconds because it reads all the scene data including your materials and lights and stores it on your graphics card, this means the subsequent renders will be much faster, and the more times you render the faster it gets.  The better your graphics card, the faster it will render and to top it all off it's designed to be even further enhanced by nVidia's CUDA cores, so if you have a nVidia graphics card the quicker you'll be able to burn through your images.

I know I'm beginning to sound like a bit of salesman for QuickSilver, but (although it doesn't give quite as good a render as mental ray) when deadlines are fast approaching it very good to know how to use it.  Here's a link to the 3ds Max help documentation on QuickSilver:

http://docs.autodesk.com/3DSMAX/15/ENU/3ds-Max-Help/index.html?url=files/GUID-1EC7526C-A684-4D34-B351-C1B1123615C9.htm,topicNumber=d30e435245

and a video which covers the main features:
http://www.youtube.com/watch?v=wkwdAeZ2hEo

If you read all the way to here, congratulations!

I'll try to update my blog more often with some more work in progress images (I think i've said that before in prvious posts and it hasn't happened, but I'll try harder this time).

Monday 24 September 2012

Moved To Glasgow and Started Uni

I thought it was time that I updated my blog and tried to get in to the habbit of updating it more frequently again...

I moved down to Glasgow on the 28th of August, almost two weeks before the start of my course at Glasgow Caledonian University.  I'm staying with a friend I've know since we were about 3 years and just across the road are three more friends who my flatmate and I went to school with - so it's nice being able to go round to their flat for a quiet drink now and again.

Before I started my course I was going to the library and looking over my old maths books - I still have a passion for maths and hope to be able tutor some secondary school students while I'm down here - and having a general wonder around trying to familiarize myself with the new surroundings and finding the room which my classes are in.

The first day was really just a getting-to-know-you day, the people who are on the course (only 7/8) are from varying undergraduate backgrounds: there's people from clothing, multimedia, product and interior design with only one person having completed the 3D animation degree at Glasgow Caledonian University.

One the first day we were told that for our Summer project, we could either do a 30,000 - 50,000 dissertation or a 3 - 5 minute animation.  I think it would better to create a 3 - 5 minute animation because you can also present it to prospective employees which might not be quite as easy with a large dissertation, so I've already started to think of a story and a character - I think I've got something quite good, but we'll see...

-Harry

Wednesday 18 July 2012

Summer Update

So, I'm back from LA - I had a really good time and got the opportunity to go in to Disney Interactive Worlds which was very cool and pretty much how I imagined it to be; concept art and storyboards on the wall, loads of toys around people's work area and, yes, a Breakfast bar equipped with cereal and Starbucks coffee machines.  I was fortunate enough to sit in on some informal meetings between the staff as well as meeting the people I mentioned in a previous post that I'd been communicating via email with.  The best part was finally being in a working environment and getting a feel for the atmosphere.

Disneyland was another highlight, in particular the renewed Star Tours ride is absolutely fantastic; I got the Darth Vader - Boonta Eve - Coruscant combination which seems like one of the better ones.  I was fortunate that I went from 2pm to 10pm because it gave me the opportunity to see Disneyland's new World of Colors show and the fireworks above the Disney castle.  As well as that, I went up to Mammoth camping, saw a cheesy fourth of July parade and the fireworks at night, went on board the USS Iowa, saw some great sights from Griffith Observatory and ate some good burgers from In-N-Out and Five Guys.

So far this Summer I've completed three tutorial series': MAXScript 101, MAXScript Fundamentals 1 and MAXScript Fundamentals 2: MAXScript for the Masses and I'm just about to start MAXScript Advanced: Enter the Matrix.  The reason behind this overkill in learning MAXScript is that I want to push myself to the point where I can create rollouts, dialog boxes and macros which aid me when rigging; having the ability to rig is really good but you won't always have time to do all the repetitive tasks such as naming joints or creating and aligning every single controller object and this is where scripting comes in to play.  Hopefully I'll also have time to go over Paul Neale's Intermediate Rigging series which looks very good.

When I went down to GCU's open evening I was handed a flyer which had artwork on it created by previous students, one student that featured prominently was Lara Bendoris who created the excellent short film TIGERLILY as her masters dissertation, I emailed her to inquire about the course from a students point of view and she kindly replied and told me a bit about each semester, so now I know a little bit more of what to expect when I get down there.

Besides rigging I'm also casually looking in to modelling, so I downloaded some reference images of Hogarth from Iron Giant and had a shot at modelling his head, I probably spent about a day and a bit getting to where I am now, modelling around the eyes is quite annoying...  This is what I've got so far:


Until next time,
   -Harry

Monday 25 June 2012

It's been a while, how are you?

So, I know it's been a while since I updated my blog but I'm going to continue using over summer and beyond.  Talking of "beyond", I'm very pleased to say that I was offered an unconditional place on GCU's master's course entitled "3D For Virtual Environments" which I greatly accepted, which means I'll be down in Glasgow towards the end of August and I'm looking forward to it - I have a lot of old school friends down there and will even be sharing a flat with one of them!

Something else which is exciting is that I'll be going to America in a week for 12 days to stay with my Cousin, her Husband and their Daughter which I'm looking forward to.  My Cousin works for Disney and introduced me very kindly (via email) to two people who work there in the games department (who are also exceptionally kind for taking time to talk with me) and I've been talking to them for a while now and maybe I'll even get the opportunity to meet them when I go over!

If you've read through some of my other blog posts then you'll know that I want to be a Rigger or Technical Director, I knew this would involve a certain amount of scripting so at the moment I'm dedicating around five hours a day trying to lean MAXScript which is the native scripting language in 3ds Max which what I'll be using at uni down in Glasgow.  One of the people I've been talking to at Disney is a Rigger and he's been telling me a bit about Python in Maya which he uses at work; I quite like Maya, although I'm much more familiar in Max, and I realise that it's the primary software for the vast majority of companies that produce films and cinematics for games, but not just that it's also becoming more popular for creating game content so it's something that I'm definitely go learn to use it along with MEL and Python.

At the start of the summer, just like last year, I sent out many CV's with covering letters to companies all over Scotland and followed them up with calls and emails, but still no luck.  However, I called Axis Animation in Glasgow (who produced the award winning opening cinematic for Dead Island) it was Sunday and, to be honest, I wasn't really expecting anyone to be in.  But to my surprise there was one person in, a Senior Producer, who was very pleasant and who I talked to for several minutes and she mentioned that they were moving to a larger premise in the near future and would be hiring some more staff and that I'd be in a good position after the course at GCU to get a job with them!

Anyway, that's a brief round up of the 3D related stuff I've been involved in recently.  A lot of exciting things happening in the near future and I'll be sure to keep you posted.

-Harry